Before proceeding with this tutorial, you may want to read ours before tutorials about domain name purchasing etc., from HERE


In this tutorial, we are going to show you how you can redirect your blogspot.in or .com domain to your newly purchased domain.Requirements:
- Godaddy.com domain name
- Blogger account
Ok, Let's get started!
First of all, log into your Godaddy.com account with your User ID and password.
Link to access Godaddy.com account sign-in is HERE
The next follow step you need to do is login to your GoDaddy account and then move on to your account's "all domains" section then you would land on the page that is similar to the below image


- Now click on the gear icon which is pointed with a red arrow symbol which would result to a landing page that is shown in the below image
- Now, you need to click on DNS zone file for pointing your Blogspot domain with your newly purchased domain address on GoDaddy.com
- It's time to add some zone files, for that you need to click on Add a record option which is pointed with ORANGE arrow as shown in the below figure.

- Now, you need to add three zone file in this area, by those your purchased domain would point to Blogspot domain
- The Three zone files you should add to point your Blogspot domain with your purchased domain are;
- 216.239.32.21
- 216.239.34.21
- 216.239.36.21
- 216.239.38.21
- Above shown are the "A" records for your GoDaddy account to point your domain with Blogspot domain
- Now, you need to press on the orange arrow symbol to get the "ADD ZONE RECORD" section like below

- Copy page each "A" record zone file into the point to field and type "@" symbol in the HOST field and keep the TTL to 1 Hour by default. After Entering all the "A" records click on FINISH button to complete the "A" record entering process.
- It's time to add CNAME Records
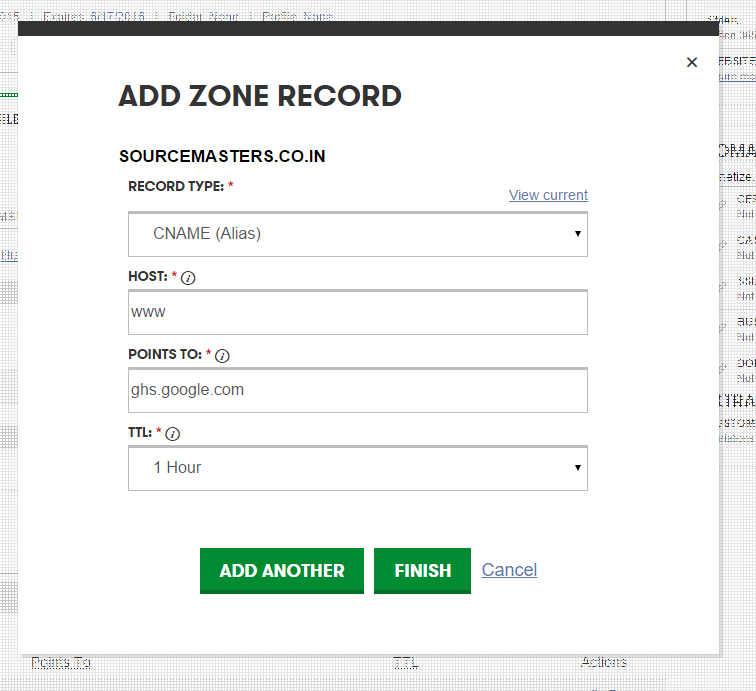
- Choose the type "CNAME(Alias) from the Record type drop-down list.
- In "HOST" field enter WWW and in the next field that is POINT TO, enter ghs.google.com with TTL 1 Hour
- And finally, click on FINISH button to complete the CNAME records addition.
- After completing all the above steps, we now move on to Final step in godaddy.com that is Adding Another CNAME record to validate your Blogspot domain at Blogger.com

- For this record settings, you need to add settings
- RECORD TYPE: CNAME(Alias)
- HOST: custom HOST From blogger
- POINTS TO: Custom POINTS TO from blogger
- To find the CUSTOM HOST ID and CUSTOM POINTS TO ID from your blogger, go to settings--> Basics

- Click on Enter Third Party URL
- Now enter your Domain name which you purchased on Godaddy.com and press enter, then you would see results like below image

- Enter those above HOST and POINTS TO ID's by copying from the blogger and enter those two ID's into Godaddy.com like we said before in the previous step.
- After Completion of adding all three ZONE files at Godaddy DNS section, now it's time to save those all changes you have done so far
- Just click on the SAVE CHANGES option to Finish your SETUP at Godaddy.com
- SAVE CHANGES option is shown with RED ARROW in the below image.

- The task is not yet completed, you need to redirect your old blog address to the new setup domain
- That can be done by going into the blogger settings --> Basics
- Then you would see some like below image

- Just Check the CHECKBOX to start redirecting your Blogspot domain to your new domain address which is hosted at Godaddy.com.
- After completion of all the above-mentioned steps, your Blogspot domain is ready to rock and roll with the new domain address!
That concludes this part of the tutorial :)


Team SVR will try to solve your issue regarding the content on this site, feel free....
Show Emoji IconsHide Emoji Icons