Before we are going to look at the creation of Dynamic and Static pages creation in blogger blog, you may consider reading our previous tutorial on how you can integrate your site or blog with google webmasters tools from HERE.
Requirements:
Hello, Everyone! Today we are going to show you how you can create Dynamic and Static pages in blogger blog.Ok, Let's start the mode
Requirements:
- Blogger blog
- Google Account
Dynamic and static pages are very useful for every blogger blog who want to post things under a certain category.
By default, any post that you post on blogger blog will be under HOME page, you can't see that post anywhere on the website except HOME page!
Well, that's the disadvantage with the default layout blogger. That's not an issue for us as we are going to overcome this issue by creating pages with a specific category each.
- Let us assume a scenario about blogger blog posting;
- Suppose you are blogging on the below categories..,
- Tech
- Health
- Jobs
- Now, we are talking about the default feature of blogger layout...
- You have created a blog post on health topic and posted it on to your blogger blog and guess what the post would be available on the HOME page of the blog.
- Next time you create a post on TECH and posted it to blogger and the same thing happen with TECH post too, It resides under HOME page.
- You want to provide your users with different navigations for TECH and HEALTH separately not only on the HOME page.
- In order to over from the above scenario, you need to install pages plugin onto your blogger layout which would create separate navigations for HEALTH and TECH.
- You might be wondering I am a newbie and how can I accomplish that, right? Well, need not to worry our next steps would explain the creation on installing PAGES plugin to your blogger layout
Before going to start our tutorial, you need to login to your blogger account with your ID and Password.


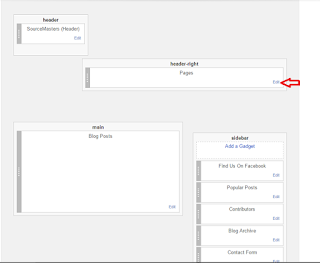

- After logging into the blogger navigate to LAYOUT section which is shown in below image

- After entering into the layout section, you would see a HEADER section with "ADD A GADGET " option, click on that option
- Then a pop-Up would appear showing your several different gadgets, scroll down until your find PAGES gadget from that list.
- After finding the PAGES gadget successfully now, it's time to add that gadget into your blogger template by just clicking on the + button on the page.
- For your reference, we have created an image illustrating the above step

- This is how your blogger blog looks if there is not navigation for different categories on your blog. See the image by clicking on it.

- After adding the PAGES gadget to your layout, you need to move on to the POSTS section.
- In the posts section write a post on your category, say HEALTH or anything.
- After completing the posting creation, you need to perform below steps;
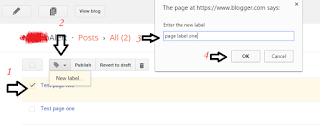
- Select the post
- Click on "Label" symbol
- Give Label name
- Click on OK

- Step -1 can be performed by checking on the post
- Step-2 can be performed by clicking on the label symbol after checking the post successfully
- Step-3 can be Performed by typing your label name according to your post category
- Step-4 can be done by clicking on OK to complete the Lable creation.
All the above steps are illustrated with an image that is above, click on the image for better view.
- After completing the Lable creation, check the post and then click on VIEW option to open the post.
- Now copy the post URL and save it in any document editor
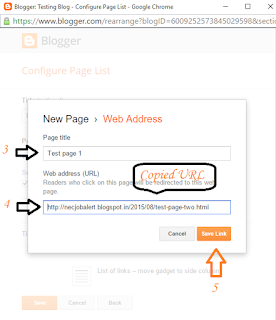
- Let's again move on to the layout section from blogger and perform the follow steps as shown in the below image

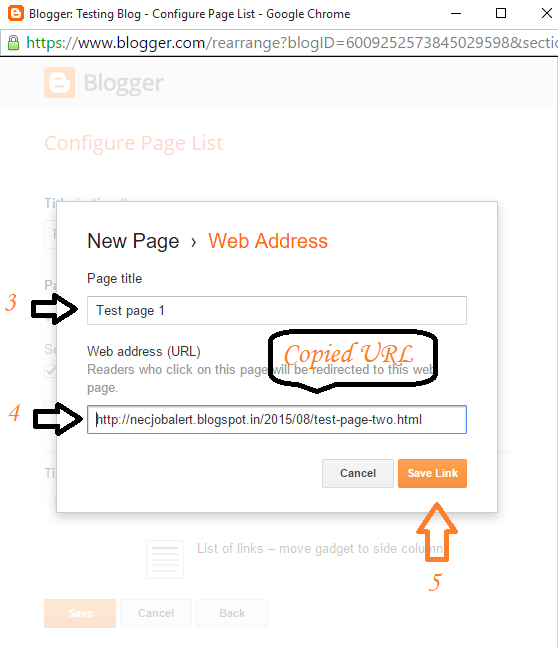
- After entering into layout section, you would find pages gadget in the header, just click on the EDIT as shown in the above-left side image
- That would result in the next image which is shown above, right site image.
- Give page TITLE and paste the URL that you saved previously in your document editor
- Finally, click on SAVE LINK button as shown in the above right side image.
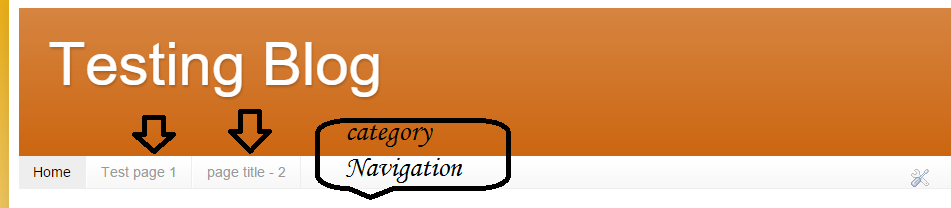
The result of all the above-shown tutorial would result like the below image.
If you had done According to the above-mentioned scenario, you would see HEALTH and TECH pages navigation in the place of TEST page - 1 and TEST PAGE -2!
- That's it, now you have navigation menu with separate categories for your posts
NOTE: Whenever you post on something with a specific category, create a label for it and mention the label name in te "LABELS" section in order to show your posts under that page category.
That conclude over tutorial on how to create DYNAMIC and STATIC pages in blogger for posting posts under a certain category.
Did we miss anything? Share us in comments!


Team SVR will try to solve your issue regarding the content on this site, feel free....
Show Emoji IconsHide Emoji Icons